|
martymouse
|
 |
« on: April 26, 2011, 21:01:24 » |
|
As some of you will have seen in my intro, I've got the X9 to accompany my daughter 1,000 miles to the south of France - she's doing it on a moped!! Having bought a rather too ratty one, I am in the process of sorting it out so I can be moderately confident it will make the journey. I'm reasonably confident as I will be limited to moped speeds and frequent stops but my habit is to make sure I know enough about any bike I get, so this will be a sort of rambling diary.
My first act was to wash it and examine more closely what I'd done ...
Good news - all the panels were intact no cracks, just occasional nicks and marks consistent with an 8 year old bike, all the instruments worked, it started (with a strange noise) and seems to run well - it was a day to day bike.
Bad news - it is an unloved day bike so needs loads of TLC, front suspension is iffy, front brakes are marginal and the seat is as soft as soft thing.
So I've stripped off most of the panels I can where the screws aren't rusted in and begun the job to tidy it up ...
|
|
|
|
|
 Logged
|
Steve  '02 Suzuki Hayabusa GSX-R 1300 '59 reg Burgman 650 Executive K9 (no more) '53 reg X9 Evo 125 (it was ratty ... now much better) Honorary Pulse Scout 50cc long distance steed Lapsed motorcycle instructor and examiner |
|
|
|
martymouse
|
|
« Reply #1 on: April 26, 2011, 21:02:50 » |
|
Oh ... and I committed the cardinal sin of not having a master key  |
|
|
|
|
Logged
|
Steve '02 Suzuki Hayabusa GSX-R 1300 '59 reg Burgman 650 Executive K9 (no more) '53 reg X9 Evo 125 (it was ratty ... now much better) Honorary Pulse Scout 50cc long distance steed Lapsed motorcycle instructor and examiner |
|
|
Dave Milnes
Administrator
Old Timer

 Offline Offline
Posts: 21256
Fylde Coast
|
|
« Reply #2 on: April 26, 2011, 21:12:34 » |
|
Fingers crossed then, but on the 125 the cost isn't anywhere near as high if it does go wrong so not such a big issue.
Seats can be swapped or re-foamed by any upholsterer and the main thing you probably need to take care of is electrical connections and relays.
A smear of silicon grease on all connectors keeps the damp out and coppaslip on all screws, bolts and caliper pins.
I'd stick some ultraseal or similar in the tyres too if heading off long distances. Both bikes.
|
|
|
|
|
Logged
|
2004 X9 500 Evo in YELLOW - 2016 Maxsym 600i SportAnderton 2004, Pen-y-cae 2005, Matlock 2006, Hay on Wye 2007, Minehead 2008, St Florence 2010, Newent 2011, North Kyme 2012, Betsw-y-coed 2013, Hardraw 2014, Parkend 2015, Whitby 2016, Mundesley 2017, Derby 2018, Telford 2019, Loch Doon 2020, Cumbria 2021. 
|
|
|
|
martymouse
|
|
« Reply #3 on: April 27, 2011, 09:20:53 » |
|
Well, the first job was to remove as much of the bodywork as possible and see what was behind it. Wow - everything was dirty and every screw was rusted. Most of the time a little effort and plusgas sorted it but a few are solid in and resist even the impact driver. I can't get the rear mudguard off at all and I am not keen to drill the screws out. That's a big box of plastic to be re-attached at some point. All the screws are in little envelopes, but I will be replacing as many as possible with stainless based on the recommendations (and Screwfix) elsewhere in the forum. Lots of water and soap and muc-off and gunk later and the panels are clean - inside and out. Must have shaved a few kilos off the weight already. Same for the exposed frame. Actually quite a lot of framework under the body plastics - and a lot of rust  The frame looks more orange than black but the washdown helps clear the dusty stuff. I spent an afternoon with the cure-rust and it has made a huge difference; the frame looks mostly black and most of the rust that I could reach has been treated ... then do it again in the bright sunlight on all the bits i've missed. |
|
|
|
|
Logged
|
Steve '02 Suzuki Hayabusa GSX-R 1300 '59 reg Burgman 650 Executive K9 (no more) '53 reg X9 Evo 125 (it was ratty ... now much better) Honorary Pulse Scout 50cc long distance steed Lapsed motorcycle instructor and examiner |
|
|
|
Mr.Chips
|
|
« Reply #4 on: April 27, 2011, 09:59:13 » |
|
Following this thread with interest!   |
|
|
|
|
Logged
|
Mike.
Honda Forza 350 - Adso
NIU GT - HAL
When did you last read the Highway Code?
Now part of the NE England Chapter.
"All that is necessary for the triumph of evil is that good men do nothing."
Edmund Burke
|
|
|
|
unchained
|
|
« Reply #5 on: April 27, 2011, 13:28:56 » |
|
Sounds like you are having fun!
I have had my 125 for 2 and half years and do have the red key but have never had the need for it so hopfully yours will be the same.
The rear mud gaurd and number plate hanger are welded on mine as well but this has never caused a problem either.
Keep us updated.
Bob
|
|
|
|
|
Logged
|
X9 500sl 03 Reg, now in Black Yamaha FJR1300AS 07 reg X9 500 Evo 06 restored to grey and sold X9 500 Evo 04 in blue (Sold to a gent in West Brom) X9 125cc 51 Reg in red (now sold) X9 250sl 03 Reg (Given away, it left me in the back of a Micra!!!) |
|
|
Dave Milnes
Administrator
Old Timer
Offline
Posts: 21256
Fylde Coast
|
|
« Reply #6 on: April 27, 2011, 14:32:50 » |
|
You hardly ever need the rear mudguard off so not a problem really.
Best thing to do with the frame is give the whole thing a coat of black smoothrite. Then re-clip all the wiring looms with freshly greased connectors then before attaching the panels back on, give the whole thing a thorough soaking in FS365 waterproofer.
|
|
|
|
|
Logged
|
2004 X9 500 Evo in YELLOW - 2016 Maxsym 600i SportAnderton 2004, Pen-y-cae 2005, Matlock 2006, Hay on Wye 2007, Minehead 2008, St Florence 2010, Newent 2011, North Kyme 2012, Betsw-y-coed 2013, Hardraw 2014, Parkend 2015, Whitby 2016, Mundesley 2017, Derby 2018, Telford 2019, Loch Doon 2020, Cumbria 2021.
|
|
|
|
martymouse
|
|
« Reply #7 on: April 27, 2011, 15:49:50 » |
|
Not sure I will go for the smoothrite as the cure-rust creates a black inert coating. I am not stripping back to bare frame so the cure-rust should be adequate for my purposes. I was just pondering an underbody spray and I've heard good things about the scottoil stuff so that is on the agenda.
|
|
|
|
|
Logged
|
Steve '02 Suzuki Hayabusa GSX-R 1300 '59 reg Burgman 650 Executive K9 (no more) '53 reg X9 Evo 125 (it was ratty ... now much better) Honorary Pulse Scout 50cc long distance steed Lapsed motorcycle instructor and examiner |
|
|
|
martymouse
|
|
« Reply #8 on: April 27, 2011, 15:52:23 » |
|
I'm working on a non-technical solution for the lack of master key - i can't afford to lose the single key so it needs to be entirely safe. Won't talk about it in the open as it is a potential security risk - but not as big a deal as if I lose the only key!!
|
|
|
|
|
Logged
|
Steve '02 Suzuki Hayabusa GSX-R 1300 '59 reg Burgman 650 Executive K9 (no more) '53 reg X9 Evo 125 (it was ratty ... now much better) Honorary Pulse Scout 50cc long distance steed Lapsed motorcycle instructor and examiner |
|
|
|
martymouse
|
|
« Reply #9 on: April 28, 2011, 09:28:55 » |
|
It's funny how the little jobs take a lot of time but are more satisfying. I've now spent ages going over the frame getting the rust spots - and getting more picky each time, looking behind cables and touching up where they rub. I've got to most of the places I need to or can reach - there's only so far I want to strip things down.
I noticed the cable to open the seat was bound so the seat never locked. As I've got all the plastic off, I have been pouring oil and pulling the cable to free it and bingo, it is all free again so I can pull the front lever to open the seat. I now need to test the electrics to see if the seat solenoid works - no biggie if it doesn't.
Which brings me on to a question. How does the front 'flap' operate? Currently there appears to be no latch or other mechanism - I just need to get a finger and lever it open to get access to the fuel and seat latches. This can't be right. I've looked in the assorted manuals and there appears to be nothing. Anyone any ideas before I have to put it back together?
|
|
|
|
|
Logged
|
Steve '02 Suzuki Hayabusa GSX-R 1300 '59 reg Burgman 650 Executive K9 (no more) '53 reg X9 Evo 125 (it was ratty ... now much better) Honorary Pulse Scout 50cc long distance steed Lapsed motorcycle instructor and examiner |
|
|
|
poldark
|
|
« Reply #10 on: April 28, 2011, 09:37:14 » |
|
Not an X9 expert (though one will be along shortly), but on the X8 you pushed the ignition key in to pop the fuel flap - suspect it'll be the same.
|
|
|
|
|
Logged
|
Honda NC750X DCT ('17)  |
|
|
Dave Milnes
Administrator
Old Timer
Offline
Posts: 21256
Fylde Coast
|
|
« Reply #11 on: April 28, 2011, 10:19:03 » |
|
Yes except when the steering lock is on, in which case only the plip remote works.
|
|
|
|
|
Logged
|
2004 X9 500 Evo in YELLOW - 2016 Maxsym 600i SportAnderton 2004, Pen-y-cae 2005, Matlock 2006, Hay on Wye 2007, Minehead 2008, St Florence 2010, Newent 2011, North Kyme 2012, Betsw-y-coed 2013, Hardraw 2014, Parkend 2015, Whitby 2016, Mundesley 2017, Derby 2018, Telford 2019, Loch Doon 2020, Cumbria 2021.
|
|
|
|
martymouse
|
|
« Reply #12 on: April 30, 2011, 08:20:51 » |
|
Thanks for the glove box info.
I've now worked out the latch (dead simple even for me!) but there appears to be no linkage from the ignition switch to the latch though the whole switch body does push in. I wondered what that was for. I'll come back to this on the reassembly
|
|
|
|
|
Logged
|
Steve '02 Suzuki Hayabusa GSX-R 1300 '59 reg Burgman 650 Executive K9 (no more) '53 reg X9 Evo 125 (it was ratty ... now much better) Honorary Pulse Scout 50cc long distance steed Lapsed motorcycle instructor and examiner |
|
|
Dave Milnes
Administrator
Old Timer
Offline
Posts: 21256
Fylde Coast
|
|
« Reply #13 on: April 30, 2011, 08:42:58 » |
|
There should be a little plastic lever pivoting on a small bolt on a lug on the frame that the ignition surround pushes on to open the latch. Either it's got broken, removed for some reason, or it not located properly. You can just see it under the ignition barrel on this photo.  It should be more vertical so the top end with the 'roll' shape butts up to the alloy ignition surround. |
|
|
|
|
Logged
|
2004 X9 500 Evo in YELLOW - 2016 Maxsym 600i SportAnderton 2004, Pen-y-cae 2005, Matlock 2006, Hay on Wye 2007, Minehead 2008, St Florence 2010, Newent 2011, North Kyme 2012, Betsw-y-coed 2013, Hardraw 2014, Parkend 2015, Whitby 2016, Mundesley 2017, Derby 2018, Telford 2019, Loch Doon 2020, Cumbria 2021.
|
|
|
|
martymouse
|
|
« Reply #14 on: April 30, 2011, 08:44:16 » |
|
The right hand suspension leg was weeping so I knew something had to be done. I was going to do the seals but noticed the chrome at the rear of the fork had split so was probably cutting the seal so no point replacing it. I got a whole new fork leg - because it was going to be easier.
Then I had to figure out how to get them off. On the 125 evo they are like standard motorcycle legs, just shorter and with a single yoke. All the brake caliper and top yoke bolts loosened easily enough (more on brakes later). Then it was back to the challenge of removing the mudguard screws and the wheel spindle. Lots of plusgas and serious abuse with the impact driver later the screws were still there. So out with the drill and off with their (screw) heads. The spindle was even tougher because one of the clamp bolt heads was broken so I couldn't get it off. Brute force and good luck got the spindle out without damaging the threads (hint - use a piece of wood and the original nut to protect things). So the right hand unit is ready to go ...
Everything was loose but the leg wouldn't come out. It would twist but not slide down. Then the penny dropped (and the haynes manual is useless on this - and many other X9 things) the suspension unit top bolt would have to come off as well.
Did I forget to mention that the top screw for the radiator grille is also rusted solid and does not easily want to give up. Fortunately there are access holes and just enough clearance.
** health warning ** The suspension spring was not under pressure when I removed the top bolt but be careful if you do this with the suspension even slightly loaded.
Out with the old, slide in the new attach the top bolt etc. and job done. However, the left hand unit also suffers from unmoveable screw syndrome (USS) so that's not going anywhere, but that raises another question...
On the new leg I can easily set up the correct amount of fork fluid, but how can I do this on the old leg? Can I simply remove the bottom bolt and pump it out before filling from the top? That would be the easiest. I'm off to try it on the old leg.
Finally, on this mega-post, I now have a spare, slightly butchered right suspension leg. If it is of any use to anyone, drop me a note and it is yours for the price of the postage - or drop in for a coffee and take it away.
Steve
|
|
|
|
|
Logged
|
Steve '02 Suzuki Hayabusa GSX-R 1300 '59 reg Burgman 650 Executive K9 (no more) '53 reg X9 Evo 125 (it was ratty ... now much better) Honorary Pulse Scout 50cc long distance steed Lapsed motorcycle instructor and examiner |
|
|
|
dididowell
|
|
« Reply #15 on: April 30, 2011, 09:28:31 » |
|
Hi Marty, Sounds like the X9 is getting the full treatment. I'm intrigued about your proposed trip, why is your daughter doing it on a moped? And which moped does she have?. Many years ago I replaced my wife's old Honda Melody for a Honda Met-in and we decided to go on holiday with them (you see so much more when you are travelling at 30mph). We went from Blackpool to Boston and back and it was really very enjoyable. To make the seat more comfortable, cut the underside dished part of the seat base out (the hump which provides room for a helmet) That stops you being pushed forward, and then through the hole push a tennis ball to the top front of the seat nose. The standard seat causes you to submarine to the front of the seat and is rather uncomfortable around the wedding tackle area.  The mod I've described stops this happening.  |
|
|
|
|
Logged
|
650 exec ALO, |
|
|
|
martymouse
|
|
« Reply #16 on: April 30, 2011, 10:03:52 » |
|
Hi - the reason for the trip is to ride 1,000 miles and raise £1,000 for Cancer Research. Kathryn's mum (and my other half) died of cancer when Kathryn was 12 and now she wants to do something.
She has a generic 50cc chinese moped to do the trip which she uses for her daily running round and to school. I've got the X9 to go along - a little more comfort. The Super Blackbird would kill me at 20-30mph for 5 days.
Thanks for the seat hint, but I've had it re-stuffed (if that's the term) to make it very firm so should retain some comfort and dignity.
She is raising donations through justgiving.com and with suitable irony she has called it 'mopeddash'. We leave on 11th July 2011.
Steve
|
|
|
|
|
Logged
|
Steve '02 Suzuki Hayabusa GSX-R 1300 '59 reg Burgman 650 Executive K9 (no more) '53 reg X9 Evo 125 (it was ratty ... now much better) Honorary Pulse Scout 50cc long distance steed Lapsed motorcycle instructor and examiner |
|
|
|
julian
|
|
« Reply #17 on: April 30, 2011, 10:39:59 » |
|
Re the glovebox flap catch. The hook that engages can get worn so it no longer catches, it can break, or the spindle that hold s it can simply move out of its cage and the hook just hangs there doing nothing, or I guess potentially drop out. Here is what it should look like from behind the panel. It is a 250 but should be the same on the 125. 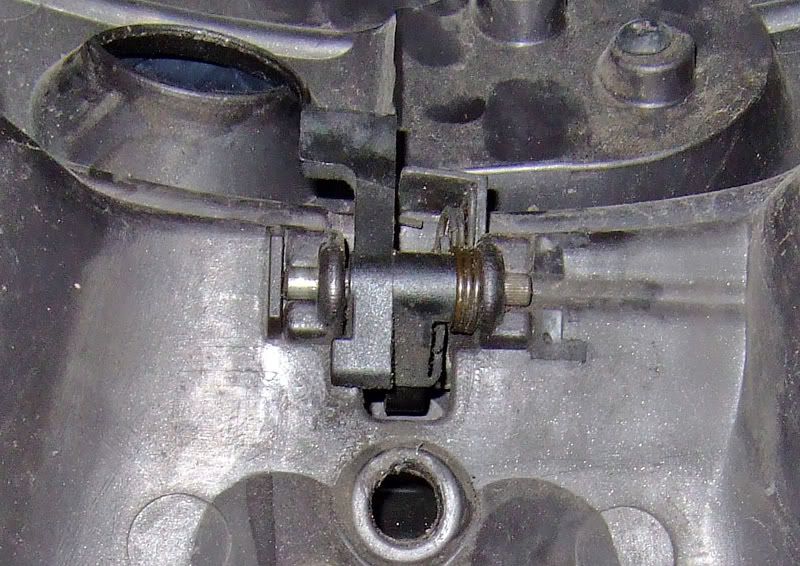 |
|
|
|
|
Logged
|
|
|
|
|
martymouse
|
|
« Reply #18 on: April 30, 2011, 19:31:53 » |
|
Thanks for the catch info. The linkage from the ignition to the flap is missing in mine. The sprung latch is there on the flap itself. It might be a challenge to get the link piece so time to track down a breaker model.  |
|
|
|
|
Logged
|
Steve '02 Suzuki Hayabusa GSX-R 1300 '59 reg Burgman 650 Executive K9 (no more) '53 reg X9 Evo 125 (it was ratty ... now much better) Honorary Pulse Scout 50cc long distance steed Lapsed motorcycle instructor and examiner |
|
|
|
martymouse
|
|
« Reply #19 on: May 03, 2011, 07:17:15 » |
|
Well, that's the front suspension done. The last job was to put the fork oil into the new leg. I saw the assorted posts on what weight to put in (10, 15, 20W). Off to Halfords to get some fork fluid. They had a 10/30W fork fluid so that's what I've gone for. Only another 900cc to use up!! The old fork leg is going to have to make do as I can't get the top cap off. I might go back later and try.
To be honest when I rode it back in full ratty state, the suspension was manageable and I've ridden worse (though I shouldn't admit it).
So now the forks are done, it is time to re-assemble the front wheel and brakes.
|
|
|
|
|
Logged
|
Steve '02 Suzuki Hayabusa GSX-R 1300 '59 reg Burgman 650 Executive K9 (no more) '53 reg X9 Evo 125 (it was ratty ... now much better) Honorary Pulse Scout 50cc long distance steed Lapsed motorcycle instructor and examiner |
|
|
|
martymouse
|
|
« Reply #20 on: May 03, 2011, 07:48:18 » |
|
When I was sorting the suspension, obviously the front wheel was coming off and also the back wheel because the brake pads were going to be replaced and the system bled.
The wheels and tyres were good, but the lacquer/paint has flaking off the wheels in a lot of places and in big chunks and it was very furry in places. Another sign of a well used but unloved machine - the ravages of winter on the alloy. Same problem on various engine cases which have had a similar treatment.
All i needed was a screwdriver to peel back the big chunks of paint off the wheels. My aim is tidy and clean, not back to original so I planned to use a straightforward silver metal paint to cover up where necessary. The first job was to clean it up ready for painting and this was a combo of scraping, wire wool, wet and dry and the Dremel. The dremel was brilliant for getting rid of large areas of corrosion and taking the corroded areas back to good paint and metal.
This is not hard work, but it is tedious as the wheels are awkward to get at and I had no plans to take the discs off. The back wheel was easier having only one disc. The discs got a lot of wire wool treatment and came up well. Amazing what difference a shiney edge makes.
I stole the kids paintbrushes to do the touch up work for two reasons (well 3 actually); I didn't need to buy them, they can get into small crevices and awkward spots and they clean out really easily cos they are small.
The paintwork is completed and the finish is not high art, but effective. I now have two-tone silver wheels in a very avant-garde and random pattern, though the new silver paint is likely to dull (I hope). They are clean and free of corrosion and that was more important.
Well that was a break from mechanical work but before the wheels could go back on, time for the brake pads.
|
|
|
|
|
Logged
|
Steve '02 Suzuki Hayabusa GSX-R 1300 '59 reg Burgman 650 Executive K9 (no more) '53 reg X9 Evo 125 (it was ratty ... now much better) Honorary Pulse Scout 50cc long distance steed Lapsed motorcycle instructor and examiner |
|
|
Dave Milnes
Administrator
Old Timer
Offline
Posts: 21256
Fylde Coast
|
|
« Reply #21 on: May 03, 2011, 10:07:36 » |
|
Careful with aligning the speedo sensor. Make sure the lugs on the wheel go between the blades on the inner rotor, and grease it well.
|
|
|
|
|
Logged
|
2004 X9 500 Evo in YELLOW - 2016 Maxsym 600i SportAnderton 2004, Pen-y-cae 2005, Matlock 2006, Hay on Wye 2007, Minehead 2008, St Florence 2010, Newent 2011, North Kyme 2012, Betsw-y-coed 2013, Hardraw 2014, Parkend 2015, Whitby 2016, Mundesley 2017, Derby 2018, Telford 2019, Loch Doon 2020, Cumbria 2021.
|
|
|
|
martymouse
|
|
« Reply #22 on: May 03, 2011, 11:58:30 » |
|
Cheers Dave - that was the biggest hassle - aligning the speedo drive. It should be greased enough ....
|
|
|
|
|
Logged
|
Steve '02 Suzuki Hayabusa GSX-R 1300 '59 reg Burgman 650 Executive K9 (no more) '53 reg X9 Evo 125 (it was ratty ... now much better) Honorary Pulse Scout 50cc long distance steed Lapsed motorcycle instructor and examiner |
|
|
|
martymouse
|
|
« Reply #23 on: May 05, 2011, 12:40:03 » |
|
How easy is it to get a spare key cut? I'm not worried about the transponder just a key. Can it be done at your local key place or are they specialised?
Thanks - Steve
|
|
|
|
|
Logged
|
Steve '02 Suzuki Hayabusa GSX-R 1300 '59 reg Burgman 650 Executive K9 (no more) '53 reg X9 Evo 125 (it was ratty ... now much better) Honorary Pulse Scout 50cc long distance steed Lapsed motorcycle instructor and examiner |
|
|
|
alphacrust
|
|
« Reply #24 on: May 05, 2011, 13:22:31 » |
|
You can get a key cut at most good locksmiths. They shouldn't be charging you more than 10 quid for a spare key. As you mention a basic spare will let you unfasten the steering lock / turn the engine over, but wont start the bike. You're talking about £30+ for a chipped key that will need to be programmed from the original master key. Just make sure you use a half decent locksmith as I've had spare keys that have broke in the ignition barrel - bit of a ball ache for the RAC man to get out. Paul. |
|
|
|
|
Logged
|
Current: Honda Forza NSS125. Past: Sym Joymax 125i, Aprilia Atlantic 125, X9 Evo 125, XEvo 125, X8 125, Peugeot Elystar 125, Speedfight 206 WRC x 2. West Yorkshire, England. |
|
|
|


